Your car’s air conditioning system is designed to keep you cool and comfortable, especially during hot weather. At its core, the system works by removing heat from the air inside your vehicle and releasing it outside. The main components involved in this process include:
- Compressor: Often referred to as the heart of the AC system, the compressor pressurizes the refrigerant and circulates it through the system.
- Condenser: This component dissipates heat from the refrigerant, turning it from a gas back into a liquid.
- Evaporator: Located inside the cabin, the evaporator absorbs heat from the air, cooling it before it’s blown into the interior.
- Expansion Valve: Regulates the flow of refrigerant into the evaporator.
- Receiver-Drier or Accumulator: Removes moisture from the refrigerant to prevent damage to the system.
Understanding these components and their functions is crucial when diagnosing and repairing AC issues.
Common Reasons for AC Malfunctions
Several factors can cause your car’s air conditioning system to malfunction. Recognizing the symptoms early can help in identifying the root cause:
- No Cool Air: If the AC is blowing air but it’s not cold, it could indicate low refrigerant levels, a clogged condenser, or a malfunctioning compressor.
- Weak Airflow: Reduced airflow may result from a clogged cabin air filter, a failing blower motor, or issues with the ductwork.
- Unusual Noises: Grinding or squealing sounds can be signs of a failing compressor or issues with the serpentine belt.
- Foul Odors: Musty or moldy smells often suggest mold or bacteria growth in the evaporator.
- Water Leaks Inside the Cabin: This could be due to a blocked drain tube or a refrigerant leak.
Identifying these symptoms early can prevent further damage and costly repairs.
Essential Tools for AC Repair
Before attempting any repairs, ensure you have the necessary tools:
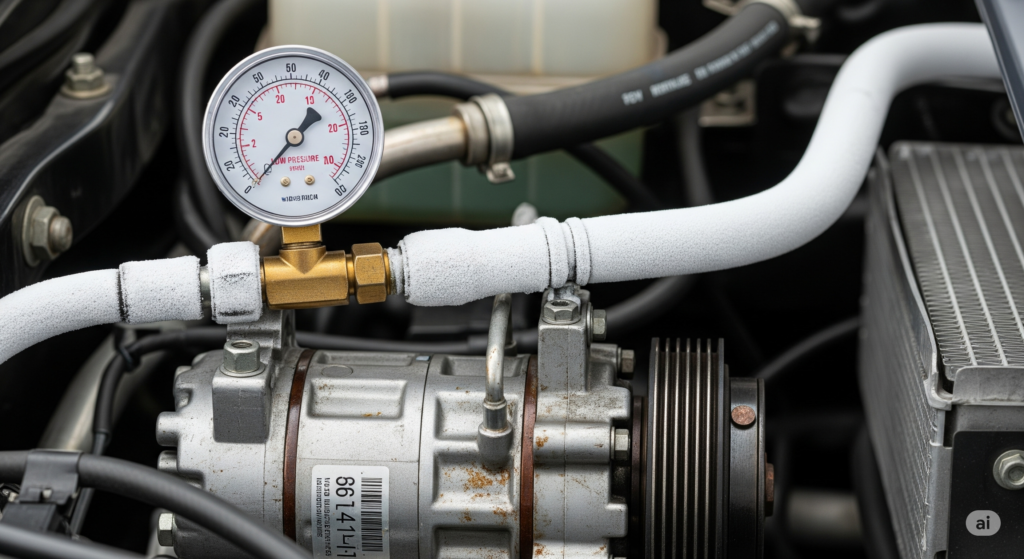
- Manifold Gauge Set: Measures the pressure of the refrigerant in the system.
- UV Leak Detector: Helps identify refrigerant leaks.
- Vacuum Pump: Removes air and moisture from the system before recharging.
- Refrigerant Recharge Kit: Allows you to add refrigerant to the system.
- Basic Hand Tools: Such as screwdrivers, wrenches, and pliers.
Safety gear, including gloves and safety glasses, is also recommended.
Step-by-Step Repair Process
1. Checking and Recharging the Refrigerant
Low refrigerant levels are a common cause of AC issues. To check and recharge the system:
- Locate the Low-Pressure Port: This is typically found near the compressor.
- Connect the Manifold Gauge Set: Attach the hoses to the low and high-pressure ports.
- Check System Pressure: Compare the readings to the manufacturer’s specifications.
- Add Refrigerant: If the pressure is low, slowly add refrigerant until the correct level is reached.
- Monitor the System: Ensure the AC is blowing cold air and the pressure readings are stable.
Always use the type of refrigerant specified for your vehicle.
2. Replacing the Cabin Air Filter
A clogged cabin air filter can restrict airflow and reduce AC efficiency. To replace it:
- Locate the Filter: Common locations include behind the glove compartment or under the dashboard.
- Remove the Old Filter: Carefully slide it out, noting its orientation.
- Install the New Filter: Insert the new filter in the same orientation as the old one.
- Test the System: Turn on the AC to ensure proper airflow.
Regular replacement of the cabin air filter is essential for optimal AC performance.
3. Cleaning the Condenser and Evaporator Coils
Dirt and debris can accumulate on the condenser and evaporator coils, hindering heat exchange. To clean them:
- Access the Coils: Remove any panels or covers obstructing access.
- Clean the Condenser: Use compressed air or a soft brush to remove debris from the condenser coils.
- Clean the Evaporator: Gently clean the evaporator coils with a coil cleaner and a soft brush.
- Reassemble the System: Replace any panels or covers removed during cleaning.
Regular cleaning of the coils helps maintain efficient heat exchange and prolongs the life of the AC system.
4. Inspecting and Replacing the Compressor
A faulty compressor can prevent the AC system from cooling effectively. To inspect and replace it:
- Check for Leaks: Use a UV leak detector to identify refrigerant leaks around the compressor.
- Test the Compressor: Listen for unusual noises and check for proper engagement of the clutch.
- Remove the Old Compressor: Disconnect the electrical connector and refrigerant lines, then unbolt the compressor.
- Install the New Compressor: Position the new compressor, bolt it in place, and reconnect the refrigerant lines and electrical connector.
- Recharge the System: Follow the steps outlined earlier to recharge the refrigerant.
Replacing a faulty compressor restores the AC system’s cooling capacity.
5. Fixing Electrical Issues
Electrical problems can disrupt the operation of the AC system. To address them:
- Check Fuses and Relays: Inspect the AC fuse and relay for continuity.
- Test the Blower Motor: Ensure the blower motor operates at all speed settings.
- Inspect Wiring: Look for damaged or corroded wires and connectors.
- Replace Faulty Components: If any components are defective, replace them with OEM parts.
Addressing electrical issues promptly ensures the AC system operates reliably.
When to Seek Professional Help
While many AC issues can be addressed through DIY methods, some problems require professional expertise:
- Refrigerant Leaks: Identifying and repairing leaks often requires specialized equipment.
- Compressor Failure: Replacing a compressor is complex and may require specialized tools.
- Electrical Diagnostics: Complex electrical issues should be handled by a qualified technician.
If you’re unsure about performing a repair, consult a professional to avoid further damage.
Preventative Maintenance Tips
Regular maintenance can prevent many common AC issues:
- Use the AC Regularly: Operating the AC periodically helps maintain system components.
- Replace the Cabin Air Filter: Regularly replacing the cabin air filter ensures optimal airflow.
- Keep the Condenser Clean: Remove debris from the condenser to maintain efficient heat exchange.
- Check Refrigerant Levels: Ensure the refrigerant is at the recommended level.
- Schedule Regular Inspections: Have the AC system inspected by a professional at least once a year.
By following these tips, you can extend the lifespan of your car’s AC system and ensure consistent performance.
DIY Car Air Conditioning Repair: Top 10 FAQs
Why isn’t my car’s AC blowing cold air?
If your AC is no longer cooling well, common culprits include a low refrigerant level (due to a leak) or a failing compressor. Leaks or compressor problems are the most frequent causes. Check that the engine-driven fan and condenser are clean and working (blocked airflow raises pressure), and replace a dirty cabin air filter if needed. Also listen for the compressor clutch: if it’s cycling on/off rapidly when on MAX cool, that usually means low refrigerant. In many cases, simply recharging the refrigerant (after fixing leaks) will restore cold air.
How can I tell if my AC has a refrigerant leak or low charge?
Signs of low refrigerant include lukewarm air, the compressor clutch failing to engage or cycling on/off, and even hissing noises. For example, if the AC clutch won’t stay engaged or it clicks on and off every few seconds, it indicates too low pressure. Look under the hood for oily or greasy residue near fittings (fluid leaking out). You can also use a gauge set on the low-side service port to check pressures: if the low-side pressure rises slowly or stays very low, refrigerant is low. A UV dye and blacklight kit can help pinpoint leaks; add dye to the system and look for glowing oil traces around hoses, fittings or the evaporator.
How often should I recharge my car’s AC refrigerant?
There’s no strict schedule like an oil change – modern systems are sealed and only need new refrigerant if they leak. In general, if the AC is still cold, you don’t need to recharge on a set timeline. Some shops suggest a “check-up” every 2-3 years as a precaution. In practice, only recharge or service the AC when performance drops (warm air, weak airflow, unusual noises) or annually before summer as a preventive step. Frequent topping-off without finding leaks is not recommended – if the charge is low repeatedly, have the system checked for leaks first.
Can I safely recharge my car’s AC myself with a DIY kit?
While DIY kits can add refrigerant, most pros advise against it. Proper recharging requires measuring the exact refrigerant weight and pressures, tasks that simple cans and a single gauge can’t do. Improper charging can overfill the system, which damages the compressor and reduces cooling. DIY cans often contain leak sealants that may clog components if misused. A professional will first locate and fix any leaks (required by law) before evacuating and refilling the AC to the correct amount. In short, DIY recharge kits may offer a quick fix but can cause bigger problems (and legal issues), so having an AC specialist handle it is the safer, more reliable approach.
What tools do I need for DIY AC repair or recharging?
At minimum, a proper manifold gauge set (with hoses and gauges) is needed to measure both high- and low-side pressures and add refrigerant safely. A basic can-only gauge (single hose) only shows low-side pressure, which is incomplete. For a thorough job, you may also need a vacuum pump to evacuate air/moisture and test for leaks, and a flush kit if replacing parts that need cleaning. UV dye and a UV light are useful for spotting leaks.
Important: don’t open or work on the AC system if it still contains refrigerant – only certified technicians with recovery machines should evacuate old refrigerant.
What safety precautions should I take when working on the AC system?
Always wear protective gloves and safety goggles when handling refrigerant or AC components. Refrigerant is extremely cold under pressure and can cause frostbite on contact; it is also toxic and can displace oxygen if released. Never vent refrigerant to the atmosphere – it is illegal and harmful to the environment (R-12 and R-134a damage the ozone and climate). If you must handle refrigerant, do so with an approved recovery machine and container. Check for proper pressure (never charge the high side port!) and follow instructions closely. In many regions, regulations require that refrigerant be recovered and leaks repaired by a certified technician.
What common mistakes should I avoid in DIY AC repair?
- Ignoring leaks. Never “just refill” without fixing a leak – the gas will simply escape again. DIY kits with sealants may temporarily hide a small leak, but they often don’t work on big leaks and can plug hoses or damage the compressor.
- Overcharging the system. Using cans and gauges without measuring by weight is unreliable. Too much refrigerant creates excessive pressure and can blow out seals or overheat the compressor.
- Mixing refrigerants. Different cars use different refrigerants (see next Q). Mixing R-134a, R-12 (“Freon”), or R-1234yf in one system can cause dangerous reactions or equipment failure.
- Neglecting moisture and debris. If parts (compressor, hoses, evaporator) fail, oil and debris can contaminate the system. Always evacuate (vacuum) and flush the system when replacing major components. Residual moisture can form acids that corrode the system if not removed.
By double-checking these points, you’ll avoid the pitfalls that turn a simple recharge into an expensive repair.
What type of refrigerant does my car use, and can I mix them?
Each vehicle is designed for one refrigerant type, and they are not interchangeable. Cars made before 1994 used R-12 (“Freon”), most 1995-2012 cars use R-134a, and many newest models use R-1234yf. You cannot mix types – putting R-134a in an old R-12 system, or R-1234yf in an R-134a system, will harm the AC (and violates regulations). If you’re unsure, check the label under the hood or owner’s manual. Always refill with the specified refrigerant only.
How effective are DIY AC fixes, and when should I see a professional?
DIY fixes can save time for very simple tasks (like changing a filter or straightening the condenser fins), but major repairs are tricky. Adding refrigerant without fixing leaks is only a temporary solution. If symptoms persist (warm air returns quickly, unusual noises, rapidly dropping pressure), the root cause likely needs professional attention. As one expert notes, DIY kits “pose many risks” – contaminants or moisture left in the system can cause acid buildup and expensive damage. In short, DIY attempts are most effective when combined with proper leak diagnosis and gauges. If you lack the right tools or if the problem isn’t obvious, it’s safer and often cheaper in the long run to have an AC specialist diagnose and repair the issue.
When should I take my car to a professional instead of DIY?
If your troubleshooting steps (e.g. adding refrigerant, replacing fuses/filters) don’t restore cold air, it’s time to see a pro. Any time the compressor fails to engage, the AC makes strange noises, or refrigerant levels drop fast again, a certified technician should check it. By law, any service that opens the AC (refill, leak repair, compressor replacement) must be done with proper equipment. Professionals have the tools to evacuate old refrigerant safely, fix leaks precisely, and refill with the exact amount required. In many cases, paying for a proper repair once will be cheaper than repeated DIY attempts or irreversible damage.